Hello, Konaddicts! Today is the big day! That's right - today is Puppy Bowl XI! Yes, for those of us not particularly into football, there is this super cute alternative.
So, to commemorate PuppyBowl Sunday, I created this little festive mani. Here's the lineup:
-- Image plages --
Puppy Image - T28
Lines - BM411
Football - CH35
Letters - Konad M18-M19
-- Polishes --
Kleancolor Grass Green
BM Black
Konad Special White
Kleancolor Mocha
Revlon Top Speed Expresso
Sally Hansen Insta Dri Sand Storm
Thanks for reading! And whether you go for the SuperBowl or the PuppyBowl, I hope you have a fun day rooting for your favorites!
Hello, everyone!
I've got a hopping little manicure to share for Easter!
This my little burst of Spring cheer. I started with a base of Kleancolor Pastel Yellow. I pulled out the Easter plate - Winstonia W212. The stamping was quick work; I varied the color placement of Sally Hansen Insta Dris in Urgent Orchid, Fuschia Flare, Spring Green, and Blue Blast to create my "eggs". For the accent nail, I used water decals from the Born Pretty store.
This one was quick, easy, colorful and fun - perfect for a busy holiday!
Be well, Konaddicts! I hope you have planned a special weekend filled with love, hope, family, and renewal!
Hello, everyone!
One of my nail dreams has come true! I am wearing Shah Rukh Khan nails! Shah Rukh Khan is a hugely famous Bollywood star and my very favorite actor. These super fan nails put a smile on my face every time I look down. :)
So...this mani started with a Google search. I was wondering whether anyone would make custom nail decals for you. I stumbled on Fireside Gifts on Fiverr. The seller seemed to have good feedback and the decals were only $5! I thought I would give it a shot.
I placed an order for two sets, sent a link to a photo, and a few days later got a picture of my order before it was slipped into the mail. How awesome is that?
They arrived with a full set of instructions as well as a link to a video how-to. I promptly ignored the instructions (of course!) and got to work.
The quality is awesome, you get two sheets of varying sizes of decals, and they're easy to apply with a little water.
Easy, peasy and what awesome possibilities this unlocks: - babies, anniversaries, memorials, sheesh (and, of course, very attractive movie stars - haha)!
You'll have to have a white background for the decals. I started with a white base, applied the decal, and then polished the area around it black. There's a bit of a "halo" here, in direct, artificial light, but you don't notice it most of the time.
This is Wet n Wild Black Creme and a dusting of the glitter Sally Hansen Complete Salon Manicure in Midnight Glitz. I used Essie Good as Gold for the stamping. The plates are BM17, BM421, Konad 16 & 17, Cheeky CH51.
Of course, these nails put me in the mood for movies!
Have you considered custom decals? What ideas do you have in mind?
Hey, everyone! I couldn't wait to show you my latest nails. I finally got around to trying out Scooby Doo pattern from the MJ Special Edition plate! I love classic Scooby Doo - I own the first couple of seasons, along with the movies, and the Dynomutt and Batman episodes - so I knew I wouldn't be happy with this mani unless I had time to get it exactly right.
It was so much fun because I got to use some of the Halloween designs in it! The ghost is from Winstonia W221, the bats from Winstonia W116, and the haunted house from BM224. I had to incorporate those crazy psychedelic flowers, so I used Cheeky CH114.
I used saran wrap to create the backgrounds. I started with darker versions of the blue and purple - Sally Hansen Insta Dri Brisk Blue and Insta Dri Urgent Orchid. I used saran wrap and a lighter color over the top - Kleancolor Pastel Blue and Salon Perfect Lavendar Fields. When I needed contrast for the stamping, I added a little darker color - Rimmel Blue Eyed Girl and Kleancolor Love Affair.
Scooby is a decal made with Konad Special polish in black and Kleancolor Mocha. The plate is the oh-so-cool MJ Special Edition from My Online Shop's facebook store.
Thanks for stopping by! If Scooby Doo teaches us anything, it's that things are rarely as scary as they first seem and that there are few situations that you - along with help from your best pals - can't make it through. :)
For this fun little mani, I started with a base of Wet n Wild Black Creme. I pulled out my stamping polishes from My Online Shop in bright yellow, green, pale blue. I used yellow and BM 14 for the stars. I used stamping polishes for the little monsters on middle and thumb. I pulled out a very old (and awesome) bottle of Sally Hansen Chrome in Burmese Ruby for the thumb monster.
For the ring finger and pinky, I stamped the monsters in white and tried to covertly (or not so covertly) fill them in with sheery polishes. The monsters are those adorable guys from Cheeky 34 and 45.
The execution wasn't perfect - I probably just should have stuck with the stamping polishes - but I love the colors!
Thanks for reading! Keep your eyes on the skies, Konaddicts!
Happy New Year, Konaddicts! 2014 is well underway. In honor of "constructing" our new year, I decided to try out the traffic and construction designs on plate OB 30. I've had this unique little plate for a while, and I've been waiting for a chance to try it out.
This mani is Sally Hansen Insta Dri Man-go Team! with Milani Black Magic and silver for the designs. I'm loving the vibrant color, especially after all of my Christmas designs. The traffic designs are from OB-30; I stamped the checked pattern on the index finger using Cheeky 13.
My "execution" - I'm sure you've noticed - could use a little work. When I tried stamping the traffic signs, I couldn't position them correctly or they bent too much around the nail and it threw off the shape. I also wanted to add a second color to the stripes, so that meant making the designs as decals. I can usually make my decals without problem, but sometimes getting them on - and tacking them down - is where I run into trouble. So...there are some weird smudges and chunky parts, but I'm enjoying this one all the same.
Thanks for reading, Konaddicts! I hope your year is off to a dazzling new start!
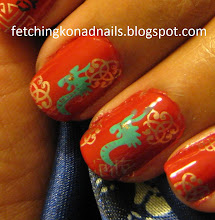
Santa's coming soon! This year, I decided to try my hand at reindeer nails.
I used a combination of stamping and easy freehand "painting" for this mani. For the patterned nails, I used Sally Hansen Insta Dri Rapid Red as a base and stamped the geometric pattern using Sinful Super Star and QA 56 (I love this pattern!). I wanted to add a little Christmas flair, so I made dots in the pattern using the bright green Kleancolor Green Glass and topped that with green glitter.
For my Rudolph nail, I used an easy 4 step photo tutorial from blanketprint.tumblr.com. My base is the nude NYC Fashion Safari. Rudolph's body is Kleancolor Chocolate Brown and his antlers and pupils are Revlon Top Speed Espresso. There's also a little Rapid Red and Super Star for eyes and nose.
I love it!
I'm not the best at free hand designs. The design on my left hand turned out well. The Rudolph on my left hand looks like he's had too much egg nog.
Take care, Konaddicts, and go easy on the egg nog!
Hello, everyone!
I wanted to share with you my slot machine nails! I decided to take a break from the wonder that is the newest set of Bundle Monster plates to try out a plate that I've wanted to use for a long time.
This cute slot machine design is from Cheeky plate CH33. I was feeling too lazy to make so many decals, so I just stamped it with Wet n Wild Black Creme over a base of NYC French White. I got out my tiniest nail brush and an assortment of colors - I tried to select some that were a little sheer - and got to painting!
I used NYC Broadway Burgundy Frost for the 7s, Wet n Wild Red Red and Sinful Happy Ending for the cherries, L'Oreal Gems B Outrageous for the bells, and Sally Hansen Insta Dri Orchid Express for the - well - whatever that thing is!
To mix things up a bit, I made an accept nail with Color Club Gingerbread Man topped with China Glaze Blonde Bombshell.
Here's wishing you a lucky, lucky day, Konaddicts!
Hello, everyone!
When I was doing my Raggedy Ann nails, I noticed that the MJ XVI plate also had an image of the Pink Panther! I was inspired by that and by all of your kind comments on the rag doll nails to give it a go. What a fun walk down memory lane!
Essie Fiji (of course!) is my base coat. Our perplexed panther is a decal made with MJ XVI and Orly's Sweet Temptation, a gorgeous chrome pink, as the stamped outline. I filled in the panther's eyes with Sally Hansen Butterfly Stroke and filled in his body with Pure Ice Love. Once I transfered the decal from the stamper to the nail, I used a pin to dot his eyes and add his eyebrows in black.
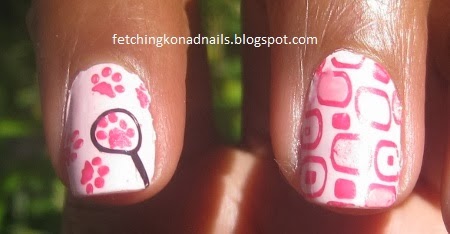
I went with a full nail pattern from Cheeky Jumbo Plate European Romance. I stamped with Sweet Temptation and filled in random squares with Love and with Kleancolor Holographic Pink.
I don't know if you remember the cartoons, but the fun part of the cartoons was watching the poor, unlucky Inspector trying (in vain) to catch the Pink Panther. I decided to make foot prints and a magnifying glass (I have been dying to use that!) to incorporate that into the manicure.
I used Sweet Temptation and Cheeky CH27 for the foot prints. I used the magnifying glass from Gals GA 47 and Milani Black Magic for the magnifying glass.
Well, Konaddicts, thanks for stopping in. I noticed I have 86 followers now! How did that happen? Thank you! I appreciate that you let me share my polish obsession with you!
Do any of you remember Raggedy Ann and Andy? I remember them! I've had the idea for this design in the back of my mind for a while - I just never quite got a chance to try it out. Well, with a season of The Closer on DVD, I decided I would sit down with my polishes to see what I could come up with.
The lovely L'Oreal Walk on the Beach is my base color. I used Konad Special in Black and plate A48 for the patchwork stamp. I filled in the patches using a nail brush with Milani Sail Away and the gel-like Sally Hansen Royal Red Creme. To add a little variety, I dotted some of them with NYC French White Tip.
The adorable Raggedy Ann design is from the MJ XVI plate (I think I purchased mine from Etsy). I could not color her "within the lines", but I tried, using the lighter Wet n Wild Red Red and the more sheer Sinful Midnight Blue.
I can't decide whether my Raggedy Ann came out cute or a little bit creepy - or maybe some of both! - but I'm enjoying this little trip down memory lane all the same.
Thanks for stopping by, Konaddicts! I hope your week is off to a great start!
Hi all,
Today I've got a beach inspired mani to share with you. I wasn't exactly sure what I wanted, so this one kind of evolved as I went along.
I started with a base of Sinful Colors Cinderella. I used a nail brush to add a "shore" of Kleancolor Mocha, and dotted it with NYC Fashion Safari and Revlon Top Speed Stormy.
I decided to add decorations to my beach shore. I tried stamping a little crab but it didn't really work well with this color set up so I decided to switch to the "decal method" for the designs. The outline provides a lot of detail and really makes the design stand out.
So, for the decorations, I used these plates:
Octopus - Mash 37
Palm Tree - Shany SH19
Crab & Seahorse - Cheeky CH39
Starfish - Gals 42
In some places, the polish got a little thick from the layers and the stamp decal, but it's a small price to pay to keep company with such cute little critters.
Hi, everyone!
I love the fish scale pattern. It's one of my very favorites to play around with. I normally can't get my colors quite right, but I'm in love with the way this one turned out (so expect A LOT of pictures!).
For this mani, I used Color Show Sweet Clementine, Milani Metallic Mango, Orly Prince Charming, and Milani Blackberry Baby.
I used Milani Metallic Mango as the base and Prince Charming and Mash 39 for the stamping. The metallic really adds to the scale-like shimmer. I made little U-shapes at the bottom of random scales with a dotting tool and Sweet Clementine.
For the accent nail, I used a base of Sweet Clementine and a decal made from plate A48 using Blackberry Baby - darker and more metallic than Prince Charming - and Metallic Mango to fill in the fish's body.
I love the shimmer and the compliment of the lighter color. I keep peeking at my nails to see whether it looks "really fishy" or just like splotches.
I think I'll be staring at this one for a while, Konaddicts! Hope your weekend ahead is a great one!
WHAT? You can make your own decals with your Konad stamper? But that's bananas! An awesome thing just got, well, awesome-er!
New technique? Here I come!
For my banana-rific background, I started with a base of Sinful Colors Unicorn, that lovely, sweet lemon yellow. I stamped bananas using Cheeky CH 20 using Wet n Wild black creme. To create a little contrast, I filled in the bananas with a nail brush using Sally Hansen Insta Dri Lightening.
To start my decals,I stamped - this is Wet n Wild black creme polish and the image is from Gals plate GA 45.
I filled in my monkey's face using a small nail brush and Kleancolor Mocha. I let it dry for a few minutes.
Next, I used Orly Prince Charming and a nail brush to fill in the rest of the monkey. I let it dry a few minutes before applying a medium-thick coat of Out the Door topcoat.
I only have two or three stampers, so I couldn't do the 4 decals all at once (and I wasn't sure how long they needed to dry). I let the first two monkeys dry overnight and used tweezers to peel them from the stampers. I made a second set and found that they were reasonably dry within about 30 minutes.
It worked like a charm!
I'm not sure if you're supposed to use topcoat on the nail before sticking the decal on. It seemed to work both ways and appeared to blend in a little better without the additional topcoat on the nail.
Omigosh! So many new possibilities! Get polishing, Konaddicts!
Hi everyone!
Am I the only one who hasn't worn this cupcake manicure? Well - not any more! It's an easy design and so much fun to wear. I started with a sheer base, polished the tips, added the stripes, then the cupcake splat and "sprinkles". Easy, peasy and soo sweet!
Apparently, February 19 is mint chocolate day! I was sad to have missed it, but decided to celebrate it as a nail design. I'm not a huge fan of mint, but any friend of chocolate's is a friend of mine!
For this tasty manicure, I started with Sally Hansen Mint Sorbet. I stamped the cakes with Cheeky CH41 and my go-to brown - Revlon Top Speed Espresso. I used a small nail brush and the sheery and slightly darker Sinful Mint Apple to around the cake slices to add a little contrast.
I decided to go for a contrasting accent nail. I used a Nail Savvy chocolate brown and stamped the "yummy" with Cheeky CH42 and Sally Hansen Insta Dri Jade Jump.
Hi, everyone! Happy Friday!
So, I've been eyeing the QA 29 plate for quite a while but I kept trying to convince myself that I didn't need any more plates! Well, this plate was on sale at the Born Pretty Store for, like, $2! Irresistible, right? (Well, that's what I keep telling myself!)
My plate finally arrived! I decided to try out a tape manicure to create the look of playing cards.
I started with Sally Hansen Whirlwind White. I used tape to create the "card" corner and used Kleancolor Metallic Black over the tape. Then, I stamped the card designs with Wet n Wild Black Creme and Sally Hansen Insta Dri Racin' Red.
So...I had some technical difficulties - my tape edges weren't straight, I ended up with another color (from where? who knows?) in the white while I was cleaning up the edges. Then I had some smearing with my topcoat. So, this one's got some flaws, but it's still pretty fun to wear.
I decided to call it "Stacked Deck" when I noticed two ace of hearts on my left hand!
to the commentry on the end of the Mayan calendar...
this kitty...
cracks me up!
I'm not much of an artist, so I could never approach Judith at Spektor'sNails awesome design of Tardar Sauce (her real name), but I still had to attempt to work this little grouch into a design.
The cat was stamped with plate OB-38 and "adapted" with a tiny nail brush. I used a nail pen for the writing.
Well...there's my grumpy manicure!
Take care, Konddicts! I hope Grumpy Cat gives you a smile as well!
Hello, everyone!
So, I've been wanting to try out a velvet manicure for a while now. I also haven't done many holiday designs - I've been too obsessed with my magnetic polishes. So, when I started this manicure, I figured I could knock out two birds with one stone - a velvet manicure with a holiday theme!
I ordered flocking powder especially for nails, but while I was waiting for that to arrive, I decided to try out Martha Stewart flocking powder (with glitter!) from a local craft store.
I started with a Martha's flocking powder in green and I selected a polish color to match.
Once I got the polish on, I thought, "Hey, this reminds me of the Grinch!" I'm not much of an artist, so when I saw a crochet patter for this hat, I had an idea of how to draw a simple Grinch face. I added a little red and white with a nail pen to add to the Christmas theme.
So I was thrilled with these! I couldn't wait until the next day to try to take a nice photo in the sunlight.
Unfortunately, all of my flocking fell off!! It seems like (at least to me) the fibers aren't long enough to really say in the polish and to give the nail that fuzzy look. It might also be a result of the glitter - which looks lovely, but must also make the flocking less dense.
So...
by the next day...
my Grinches were kind of balding!
Oh...now that makes me feel Grinchy indeed!
Oh well, I wanted to share anyway! I hope your holiday nails are staying together better than mine! :)
By the way, there have been some GREAT holiday designs floating around the blogosphere. I LOVE the designs that look like cities or snowglobes. I think I am officially obsessed with Playful Polish's Christmas Design here. Isn't that the cutest thing? I think I might have to try it before the holidays are over! Are there any designs you're trying to fit in before the holidays are over?
I love Konad and other stamping nail art! I have been Konading for about a year now. I love to see the designs that other "Konaddicts" have come up with and I wanted to create a space to share my own creations. Fun nails give me something to smile about! My email is Jcln94@gmail.com. I'd love to hear from you!

.jpg)
.jpg)


.jpg)


.jpg)
.jpg)
.jpg)
.jpg)
.jpg)

.jpg)


.jpg)
.jpg)



.jpg)
.jpg)
.jpg)
.jpg)


.jpg)
.jpg)
.jpg)

.jpg)
.jpg)
.jpg)

.jpg)
.jpg)
.jpg)


.jpg)
.jpg)

.jpg)

.jpg)
.jpg)
.jpg)
.jpg)
.jpg)
.jpg)
.jpg)
.jpg)